Learning UI (and game) design in Unreal engine

(A page under construction as I progress with learning)

Month 1: Unreal Engine Basics

Week 1-2: Introduction to Unreal Engine

Month 1
Plan
  • Install Unreal Engine and get comfortable with the interface.
  • Begin with Unreal Engine’s official beginner tutorials.
  • Learn about the Unreal Editor, asset management, and basic level design.
  • Start learning C++ in Sololearn
  •  

Lesson 1: Interface

The Unreal Engine Interface

Main Toolbar

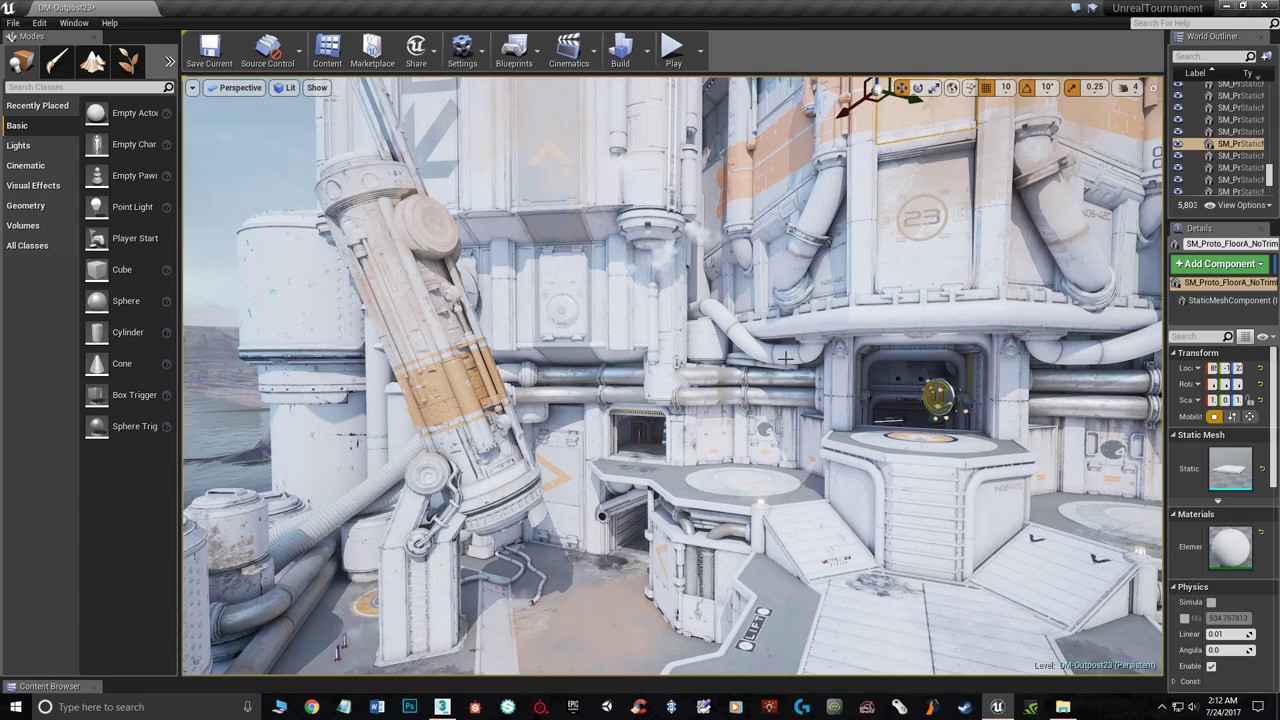
Located at the top of the interface, the main toolbar provides access to essential functions such as saving, building, and running your project. It also includes options for managing levels, assets, and actors.

The central area of the interface is the viewport, where you can view and interact with your game world in a 3D or 2D perspective. You can navigate within the viewport using various controls, including pan, zoom, and rotate.

This panel on the left side of the interface allows you to manage and organize your project’s assets. You can create, import, and organize textures, 3D models, audio files, and other resources here.

Located next to the Content Browser, the World Outliner provides a hierarchical view of all the actors and objects in your level. You can select and manipulate objects directly from this panel.

Positioned on the right side of the interface, the Details panel provides detailed information and properties for the selected object or actor. You can adjust various settings and attributes here.

At the top left corner, the Modes panel contains a variety of tools and modes for adding and manipulating objects in your level. You can access brushes, lights, cameras, and more from this panel.

Below the Modes panel, you’ll find the Toolbar and Modes Toolbar. These offer context-specific options and tools based on your current mode and selection. For example, when you’re working with geometry brushes, you’ll see options related to brush editing.

In the top-right corner of the viewport, you’ll find controls for changing the perspective (3D/2D), viewport options, and additional view-specific settings.

Unreal Engine also includes a powerful cinematic editing tool called Sequencer. It allows you to create complex cutscenes, animations, and interactive sequences. You can access Sequencer from the main toolbar or through the Windows menu.

Unreal Engine uses a visual scripting language called Blueprints, but you can also write code in C++ for more advanced functionality. The scripting and coding components are typically accessed in separate windows within the interface.

The Output Log panel provides important messages and logs related to the operation of your project. It can be helpful for debugging and troubleshooting.

Unreal Engine has an integrated marketplace where you can browse and purchase assets, plugins, and resources created by the community.

Lesson 2: Setting up a level

File/New Level > Empty Open World

Add emvironment lights

  1. Window/Env.Light Mixer
    1. Sky Light
    2. Atmosphere Lights (2x Directional Lights for sun and moon, or two suns representation)
    3. Sky Atmosphere
    4. Volumetric Cloud
Quick Tip:
  • Ctrl+L and moving mouse changes the main direction light’s direction
  •  

Save project

  1. File/Save Current Level as
    1. Create folder strucutre, save
    2. Content Drawer: Right click saved project folder name, Set Color
If level is not loaded check:
  1. Window/World Partition Editor
  2. Select your area/RMB/Load Region from Selection

Modeling mode

  1. Create/Box
  2. Accept
  3. Model/Polygroup edit
  4. Accept

Add Character for reference

  • Content Drawer/Add+/Add feature or content pack: Third Person content pack
  • Click “Blueprint” icon/World Override/BP_ThirdPersonGameMode
  • “Quick Add” icon/Basic/Player Start

Add Cubegrid

  • Modeling Mode/Create/Cubegrid

Lesson 3: Blueprints

Level Blueprints

  • Blueprint icon/Open level blueprint
  • Select Actor > Right click > Select reference to the cube (selected actor)
  • “Set Actor Hidden in Game”
  • “Set Actor Enable Collision”
  • “Delay”
  • “Custom Event” > name custom events, call custom events to make a loop

Blueprint Actor

  • Select Actor
  • “Blueprint” icon/Convert selection to blueprint class
    • Harvest Components
    • Actor
    • File path
  • Copy code to actor’s blueprint, refresh custom event nodes, delete targets (keep target as self)
  • Delete code from level
  • Modify blueprints to make them custom for each instance
    • Add Delay
    • Promote Duration to Variable
    • “Open its eye” to make it public/editable.
  • Edit the variable in the level editor’s instances.

Lesson 4: Level Designer Quick Start

Review the Unreal Tutorial

(with modifications based on learned techniques from previous video, as this is a 5.0 tutorial.)

Goal: creating a level setup checklist, and a template level for my own project.

Creating a new level with the free download: Dreamscape Tower.

Manual

Lesson 5-6: UI design in UNREAL - Styling

40 min video: https://www.youtube.com/watch?v=s-mtBIAVoeQ

  1. In the Content Drawer Create Folder for UI assets : “UI_MainMenu”
  2. Content Drawer/right click/User Interface/User Widget: “W_MainMenu”
  3. Edit/Editor preferences/Assset Editor Location: Main Window
  4. WidgetEditor:Panels/Canvas Panel (anchored, z ordered, with children, good for manual layout)
  5. Palette/Add Button
  6. Palette/Drag Text (so that it is parented to button)
    • In Button Details/Check: Size to Content
Create Button Widget
  1. Content Drawer/User Interface/User Widget: W_Button
  2. Palette/Size Box
  3. Set Size
  4. Add Button
  5. Add Text
  6. Set button name and text as variable
  7. From “Fill Screen” set to “Desired” (upper right corner)
  8. Format to desired style
  9. Compile/Save

Edit Graph (uppermost right corner)

  1. Get “Button Text Variable”
      1. Connect to “Set Text (Text)” Node
      2. Connect to “Event Pre Construct” node.
      3. Right click on “In Text” :Promote to Variable
      4. Rename Variable: New Text
      5. Click on the eye to make it “exposed” or editable
    1. In W_MainMenu widget add: User Created/W_Button

Other possible option:  An overlay instead of a canvas panel here would be less computationally expensive. Then instead of using absolute positioning for every individual button  just wrap the buttons in a vertical box.

Variables

LESSON 7: UMG UI designer Quick Start

(Omiting the compile and save phases to avoid repetition, but always compile and save when necessary)

Health and Energy

  1. Create First Person Project
  2. Create UI folder
  3. Content Drawer/UI/Widget Blueprint, create following widgets
    • HUD
    • MainMenu
    • PauseMenu
  4. Adjusting BP_FirstPersonCharacter Blueprint
    • Content/FirstPerson/Blueprints
    • Blueprint Editor/Add Variable
      • Float:Health
      • Float Energy
        • Default Value:1.0 for both
    • Graph/Event Begin Play node/ Create Widget node/Set the Class to HUD Widget.
    • Return Value of the Create HUD Widget/ Promote to Variable/ name it HUD Reference.
  5. Adjusting Character Variables in BP_FirstPersonCharacter Blueprint
    1. Drag variables Energy and Health to the graph editor
    2. Assign Health to Keyboard F
    3. Assign Energy to “Input Action Jump
    4. Add Subtract operator node, connect and set to 0.25

LESSON 8: SCRIPTING HEALTH BAR PROPERLY

Branch Leaf Tutorial on Health Bar

  • The Unreal tutorial advises to use binding for the variables, but a binding is called at every frame. Branch Leaf’s tutorial tells otherwise:
    • Create Event Dispatcher: “HealthChanged”, add float variable – percentage

C for Comment in Blueprints

Blueprint Best Practices (Unreal Documentation)

https://www.techarthub.com/10-tips-for-blueprint-organization-in-unreal-engine/

LESSON 9: NOESIS PLUGIN and RIVE

About Noesis

NoesisGUI is a AAA quality framework creating real-time user interfaces for games and was used to create AAA titles such as the in development Baldur’s Gate 3.

It uses Microsoft’s XAML markup, which can be visual authored by designers visual using the Blend editor. Neosis is realtime and high performance with native Unity and Unreal Engine implementations as well as an SDK for implementing in your own native (C++) and managed (C#) applications with relative ease. It ships with a ton of examples and good documentation and can be downloaded freely.

https://www.noesisengine.com/

  1. Unreal Tutorial for Noesis Plugin
    1. Design vector based UI with Blend
    2. Supports Rive

Blend

Blend for Visual Studio helps you design XAML-based Windows and Web applications. It provides the same basic XAML design experience as Visual Studio and adds visual designers for advanced tasks such as animations and behaviors. For a comparison between Blend and Visual Studio, see Design XAML in Visual Studio and Blend for Visual Studio.


Play Video

Appendix

UI related tutorials

V5

V4

UI related plugins

Visual Novel Plugins

Growing list of Other Unreal tutorials, features

General, Useful Plugins

Feature enhancing Plugins

Jump Mechanics

Skeletal Mesh

Constraints

en_GB